Thursday, April 25, 2019

Afghan Pulao Uzbeki...قابلی اوزبیکی


Afghan Pulao Uzbeki.....قابلی اوزبیکی  is a main course typically made with rice, meat, spices, grated carrots, onion and raisins. Afghan Pulao Uzbeki is usually prepared at home for family or guest/wedding. Afghan Pulao Uzbeki is prepared in one pot, meat, rice, carrot and stock is added and topped with fried raisins. This recipe is so simple and it's so delicious that you will definitely love. In this recipe, I'm using special Afghan Pulao Masala, which is one of the most necessary ingredients and is called the heart of the recipe. So, what are you waiting for, let's enjoy this recipe with me...step by step......


Prep Time: 30 mins
Cook Time: 1 hr
Servings: 2-3
Cuisine: Afghan
Course: Lunch and Dinner
Author: Ayesha Md


Ingredients:


600 gm fatty meat (beef/mutton) with bone (cut into 4-6 large pieces)
75 ml oil
500 gm brown rice
2 medium size onions, thinly slice
3 bay leaves
2 cinnamon sticks
2 cloves
500 ml water
2 tbsp ghee for frying meat
salt as per taste
2 carrots (Julienne cut)
50 gm raisins
4 tbsp ghee for frying raisins


Afghan Pulao Masala:


2 tbsp cumin seeds

4 green cardamoms

1 brown cardamoms


Methods of cooking:


1) Wash and soak brown rice for 2 hours.

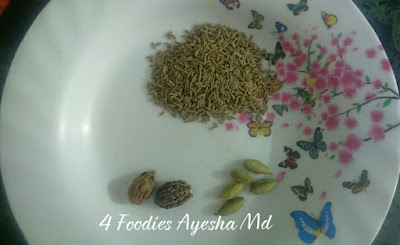
2) Take a mixer/grinder, and grind all the spices to make a powder, namely green cardamoms, brown cardamoms and cumin seeds. As shown in the picture.


3) Wash and clean meat pieces and set aside. Take a large pressure cooker, heat oil, then add bay leaves, cinnamon sticks, cloves, saute for 2 seconds. Add onion and saute well and cook for 5 minutes and add meat pieces and saute them well and cook till they change its color or turn slightly golden brown. Add salt, water and grind spices. Bring it to a boil and cover the lid and cook on low flame for about 20-30 minutes or until completely tender.


4) Open the lid of the pressure cooker and remove the meat pieces from the broth measure the broth, it should be 500 ml, if it is less than that, add a little more water. Add salt, carrots and rice, bring it to a boil. Cover the lid of the pressure cooker and cook for 5-10 minutes on low flame. As shown in the picture.


5) Heat a skillet, grease it with some ghee now add those meat pieces which had taken out of the broth previously. Place them one by one in the skillet and cook for 5-10 minutes on medium flame, turning occasionally, when they turn brown remove them from the skillet and set aside.


6) Open the lid of the pressure cooker, if there is excess moisture or water, simmer for 5-10 minutes on very low flame.

7) Take a pan, heat ghee, add raisins and fried till it turns golden brown. Add them on the top of the rice.


8) Assemble them into a serving tray. Yours Afghan Pulao Uzbeki.....قابلی اوزبیکی is ready to be served. As shown in the picture.


If you have any queries regarding this recipe don't forget to share your comment, your comments are valuable for me. It would always be a pleasure for me to serve you....And I'll be back soon with an another exciting recipe...

Tuesday, April 16, 2019

Rajma (Red Kidney Beans) Pulao/Fried Rice

Rajma (Red Kidney Beans) is a popular vegetarian dish, originating from the Indian-subcontinent. Rajma (Red Kidney Beans) has high quantities of Calcium, Fiber, Folic acid, Carbohydrates and Proteins. Rajma (Red Kidney Beans) has many benefits such as it helps in weight loss, lowers cholesterol, improves memory, it reduces the risk of developing diabetes, rich in proteins, boost energy and due to the presence of calcium and magnesium it helps to strengthen bones.

However, Pulao is loved by all. There are varieties of Pulao such as Chicken Pulao, Meat Pulao, Vegetable Pulao, Paneer Pulao etc., Rajma (Red Kindy Beans) Pulao/Fried Rice is a very special Pulao. The main ingredients are Rajma, Rice, Yogurt and Spices. In this recipe I'm going to show you how to make Rajma (Red Kidney Beans) Pulao/Fried Rice with very simple and easy steps.... Just follow these steps....


Prep Time: 30 mins

Cook time: 1 hrs 30 mins
Serves: 3-4
Course: Lunch and Dinner
Cuisine: Indian
Author: Ayesha Md


Ingredients: 


250 gm Rajma (Red Kidney Beans)
750 gm brown rice
750 ml water
salt as per taste
100 ml yogurt
1 tbsp red chili powder
2 onions (medium size), thinly slice
2 tomatoes, finely chopped
1 tbsp cumin seeds
3 bay leaves
2 cinnamon sticks
3 green cardamoms
3 cloves
6-8 black peppercorns
2 brown cardamoms
1/4 mace powder
100 ml oil
1 tbsp ghee
4 tbsp Shan Biryani Masala
2 tbsp garlic paste
2 tbsp ginger paste
3 green chilies (remove the stems)
1 tsp baking soda double action

Methods of cooking:


1) Wash and soak Rajma (Red Kidney Beans) in water. Add salt and baking powder, and soak it for overnight or at least 6-8 hr.

2) Wash and soak brown rice for 2 hrs.

3) Take a pressure cooker and add soaked Rajma (Red Kidney Beans) along with the water, cover the lid of the pressure cooker and cook for about 15 minutes on low flame or until it is 60% cooked or tendered. Drain the excess water and set aside.


4) Take an another pressure cooker, heat oil, add bay leaves, cinnamon sticks, green cardamoms, brown cardamoms, cloves, black peppercorns and cumin seeds and saute for 30 seconds. Then add onion and saute for 10 minutes or until it turns golden brown. Add ginger garlic paste, salt, yogurt, red chili powder, mace powder, Shan Biryani Masala and cook for 10-15 minutes, then add cooked Rajma (Red Kidney Beans), cook for another 5 minutes.

5) Now add water, rice, salt, green chilies and tomatoes. Bring it to boil and cover the lid of the pressure cooker and cook on low flame 8-10 minutes.

6) Open the lid of the pressure cooker, if there is excess water, then evaporates them on high flame. Add ghee at the top and let it simmer on very low flame for 5-10 minutes.


7) Yours Rajma (Red Kidney Beans) Pulao/Fried Rice is ready to be served. Serve hot with your favorite Raita.


If you have any queries regarding this recipe don't forget to share your comment, your comments are valuable for me. It would always be a pleasure for me to serve you....And I'll be back soon with an another exciting recipe...

Friday, April 12, 2019

Sugar Wax...Hair Removal Recipe Just Rs.10

Sugaring, Sugar Waxing or Persian Waxing is a method of hair removal that has been in use since 1900 BC. Sugaring was also known as sukkar or ḥalawa in the Middle East. Sugaring or Sugar Waxing can be prepared with common household items such as water, lemon juice, sugar and saltAs in candy making, this gives the finished. Sugaring wax a non-crystalline, or amorphous, structure. Getting the correct consistency takes practice for most users. Sugaring or Sugar Waxing is done with only a ball of sugar paste- no strips are needed. This method includes applying the paste to the area against the direction of hair growth and removing the sugar paste in the direction of hair growth. This produces less pressure on the hair shaft, leading to less breakage, and resulting in smoother skin than traditional wax. Source taken from: https://en.wikipedia.org/wiki/Sugaring_(epilation)

Let's discuss some of the advantages of Sugaring or Sugar waxing hair removal. It is 100% natural, longer lasting, better result and easy to clean. It is less painful, more effective and even very short hair can be removed. Sugaring or Sugar Waxing is preferable to all types of skin that's why it is called skin friendly. It minimized the risk of ingrown hairs. Sugaring or Sugar Waxing, if used regularly re-growth is very thin and gets thinly dispersed. Sugaring or Sugar Waxing can be treated to large body areas with little amount of sugar paste. Sugaring or Sugar Waxing can be prepared with just Rs.10. It is cost effective. So, if you tired of spending too much on hair removal product, then at least try this Sugaring or Sugar Waxing recipe.... Follow these simple steps....just 4 ingredients.....


Prep Time: 2 mins
Cook Time: 10-15 mins
Serves: 1
Author: Ayesha Md


Ingredients:


200 gm Sugar (fine)
4 tbsp water
1/2 tsp salt
2 tbsp lemon juice

Methods of Cooking:

1) Take fine sugar, lemon, salt and water. As shown in the picture.


2) Take an empty vessel, add fine sugar, lemon salt and water. Mix them well.

3) Now cook this mixture on very low flame about 5-10 minutes, stirring continuously, until sugar dissolved completely. As shown in the picture.


4) Turn the flame high for 1-2 minutes. Cook this Sugaring or Sugar Waxing till it turns slightly golden brown. Turn off the flame.

5) Pour into another bowl and allow it to cool down for 5-10 minutes. As shown in the picture.


6) Once it has cooled down, take a spoonful or small amount of and play with your hands for some time and then make a small ball in shape. As shown in the picture.


7) Yours
Sugaring or Sugar Waxing is ready to use. As shown in the picture.


Notes:

1) It is too hot to use directly, so allow it to cool down for 5-10 mins. Then start using it once it has cooled down.

2) Take only small amount of sugar ball so that u can throw that when it is no longer in use.

3) If Sugar Waxing become so hard, then heat it for just 2 seconds or melt it. Don't need it to cook. Otherwise, it will not be usable.

4) You can use that up to 1-2 hrs or more at room temperature.


If you have any queries regarding this recipe don't forget to share your comment, your comments are valuable for me. It would always be a pleasure for me to serve you....And I'll be back soon with an another exciting recipe....

Friday, April 5, 2019

Shakshouka شكشوكة (Egg Scrambled) Sandwich....Arabian recipe

The word "Shakshouka" (Arabic: شكشوكة) means "a mixture" in Arabic Slang specifically in Tunisian Arabic. The main ingredients of Shakshouka (Egg Scrambled) Sandwich are tomato, red chili powder, french bread and some salt. Breakfast is one of the main considerations of our daily life. According to my experience, French Bread Shakshouka (Egg Scrambled) Sandwich is one the easiest, healthiest and delicious sandwich recipe. However, making any kind of sandwiches is always a pleasure for me, because I love Sandwich. The Sandwich can be eaten as a snack or as a main meal for lunch or dinner. The Sandwich can also be eaten at picnic as a packed lunch or dinner. There are varieties of sandwich, which are popular among worldwide such as, Cheese Sandwich, Omelette Sandwich, Shawarma Sandwich, Salmon and Cream-Cheese Sandwich, Tuna Sandwich, Falafel Sandwich, Scrambled Egg Sandwich, Boil Egg Sandwich, Chicken Breast Sandwich, Meat Sandwich, Salad Mayonnaise Sandwich and apart from Savoury Sandwiches there are a variety of Sweet Sandwiches such as, Jelly and Peanut Butter Sandwich and Fruit and Jelly Sandwich etc. The Sandwich is mostly demanded by children, they love sandwiches and they often preferred sandwich as one of the their lunch boxes.
Although I've shared varieties of healthy and easy breakfast recipes and I'll keep sharing with you. Some of them are Paneer Capsicum Cheese sandwich, for recipe kindly click the given link https://ayeshamd.blogspot.com/2019/01/paneer-capsicum-cheese-sandwich.html . French Bread Shrimp Sandwich, for recipe kindly click the given link https://ayeshamd.blogspot.com/2019/02/french-bread-shrimp-sandwichnew-style.htmlIn this recipe, I used french bread instead of Sliced bread. This French Bread Shakshouka (Egg Scrambled) Sandwich needs only three ingredients, namely, tomato, egg and french bread. However, I'm not using any spices in this recipe, if you wish, you can add some red chili powder that is (optional). Let's move to this recipe....step by step with pictures....


Prep Time: 10 mins
Cook Time: 15 mins
Serves: 1
Cuisine: Breakfast, Lunch and Dinner
Course: Arabian
Author: Ayesha Md

Ingredients: 
2 Eggs
2 medium size tomatoes, finely chopped
salt as per taste
2-4 tbsp oil
1 tbsp red chili powder (optional)
1 french bread

Methods of cooking:

1) Take a large bowl, add chopped tomatoes, salt and eggs, as shown in the picture.


2) Now, beat the mixture with the help of a spoon, as shown in the picture.


3) Take a non-stick pan, heat oil, then pour this mixture into the pan and let it set for 1-2 minutes.

4) Once it has sat then with a help of a spatula, keep stirring every few seconds and cook for about 5-10 minutes or until done completely. As shown in the picture.
5) Turn off the flame, remove the Shakshouka (Egg Scrambled) from the pan.

6) T
ake a
 
Whole French Bread and slit it vertically with the help of a knife.


7) Now, fill this Whole French Bread with cooked Shakshouka (Egg Scrambled).

8) Yours French Bread Shakshouka (Egg Scrambled) Sandwich is ready. Serve hot.


If you have any queries regarding this recipe don't forget to share your comment, your comments are valuable for me. It would always be a pleasure for me to serve you....And I'll be back soon with an another exciting recipe....

Monday, April 1, 2019

Fruit Custard With Dry Fruits

While it's already been hot for weeks and the sun reaches its highest elevation, it is a perfect time to have some summer dessertCustard is a sweet dessert and these days it's become so common and loved by all. The main ingredients in custard are flour, corn starch, egg yolks, milk, cream, sugar and vanilla. The Custard can be a thick cream sauce or it can be a thin watery sauce. Now a days, there are varieties of custard powder available in the market such as Chocolate Custard Powder, Strawberry Custard Powder, Vanilla Custard Powder, Pistachio Custard Powder and Kesar Elachi Custard Powder. I already shared Strawberry Custard, for recipe, kindly click the given link. https://ayeshamd.blogspot.com/2019/01/a-for-strawberry-custard.html The Custard can be served as a sweet dessert at your lunch or dinner and it can also be served as a pleasure during tea time or parties. Dessert is a perfect sweet for all occasions and also during summer dessert are more preferable than any other sweet. Custard is all time my favorite and when it is a Fruit Custard With Dry Fruits I just can't resist to eat. Fruit Custard has a unique flavor and when it's decorated with Fruits and top it up with some Dry Fruits, it enhances its flavors as well as make it more delicious, healthy and yummy.


Prep Time: 15 mins
Cook Time: 30 mins
Serves: 3-4
Cuisine: Indian
Course: Lunch, Dinner or Party
Author: Ayesha Md

Ingredients:

500 ml whole Milk (cold)
4 tbsp cold milk for mixing custard powder
3-4 tbsp sugar
3-4 tbsp Custard powder (any flavor)
1 apple, Chopped (without peeling)
1 mango, peeled and chopped
1 banana, peeled and sliced
10-15 green grapes (seedless)
10-15 black grapes (seedless)
2 apricots, chopped
6-8 almonds, chopped
6-8 cashew nuts, chopped
2-4 walnuts, chopped
6-8 pistachios, chopped

Methods for cooking:

1) Take a small bowl, add 4 tbsp of cold milk with 4 tbsp of Vanilla Custard powder and make a smooth paste without any lumps. Set aside. Yours Custard mixture is ready.

2) Take a large pot vessel, add the remaining milk and bring it to a boil, then add sugar.

3) Now, slowly add the Custard powder mixture and keep stirring continuously to avoid burning, cook for 5-8 minutes or until it becomes thick.

4)  Turn off the flame, keep it aside to cool or it comes to room temperature. Then refrigerate it for 4 hours.

5) Just before serving, cut fruits of your choice, seasonal fruits or mixed fruits can be taken.

6) Just before serving, assemble the fruits and dry fruits in a serving bowl and pour cold custard on top of it. Yours Fruit Custard With Dry Fruits is ready.

7) Served chilled. As shown in the picture.


If you have any queries regarding this recipe don't forget to share your comment, your comments are valuable for me. It would always be a pleasure for me to serve you....
And I'll be back soon with an another exciting recipe....

Angoori Rasmalai

Rasmalai   is an Indian popular sweet dish.  Rasmalai  got its name from the two words, these are  Ras  means sweetened  milk syrup   and  M...