Wednesday, October 23, 2019

Lauki or Dudhi (Bottle Gourd) Ka Halwa ....Diwali Special

Diwali or the Festival of Lights. One of the most popular festivals of Hinduism, Diwali symbolizes the spiritual "victory of light over darkness, good over evil and knowledge over ignorance. It is celebrated in October or November each year. So what is Diwali without Diwali Food or Sweets. While talking about Diwali Recipes, the first thing that comes to mind is Diwali Sweets or Mithai which include Diwali Sweets like Gulab Jamun, Kaju Katli, Soan Papdi, Barfi and Gajar ka Halwa. So let's try this Lauki or Dudhi (Bottle Gourd) ka Halwa which is similar to the Gajar ka Halwa. You may not like Lauki ki sabzi, like me, but you will surely like this Lauki or Dudhi (Bottle Gourd) Ka Halwa. It is quite easy to prepare and at the same time it is a very nutritious dish. The main ingredients are Lauki or Dudhi (Bottle Gourd), Milk, Khoya, Sugar, Ghee and Dry fruit. Let's prepare this Lauki or Dudhi (Bottle Gourd) Ka Halwa and let's make this Diwali bright and happy.


Prep Time: 30 mins
Cook Time: 30 mins
Total Time: 1 hr
Servings: 4-5
Cuisine: Indian
Course: Lunch, Dinner or Tea Time
Author: Ayesha Md


Ingredients:

2 Cups Lauki or Dudhi (Bottle Gourd) (peeled and grated)
1 Cup Milk
2 tbsp Ghee
1 Cup Khoya or Mawa (broken into small pieces)
1/2 tsp Cardamom powder
1/2 Cup Sugar (as per taste)
6-8 Almonds (thinly sliced)
6-8 Pistachios (thinly sliced)
1 tbsp Rose water or Kewra water


Methods of Cooking:

1) Take a non-stick pan, heat the ghee on medium heat. Then add grated lauki or Dudhi (Bottle Gourd). Cook for 10-12 minutes or till all the moisture from Lauki or Dudhi (Bottle Gourd) is evaporated, keep stirring occasionally.

2) When it will reduce in size and becomes soft, then add milk and bring it to a boil and cook on high flame, do stir in between and scrape the sides and the bottom of the pan, until all the milk is evaporated.

3) When the milk is reduced and all the moisture is evaporated, then add sugar and cook for some times, as the sugar melts, it will again become watery or runny. So, keep cooking and stirring at this stage, until all the water is gone.

4) Now, add Khoya or Mawa, cardamom powder, Rose water or Kewra water, sliced almonds and pistachios, mix well, cook for 30 seconds or until all the moisture is evaporated.

5) Turn off the flame and transfer it to a serving bowl and garnish with some almond and pistachio. Yours delicious
Lauki or Dudhi (Bottle gourd) Ka Halwa is ready. Serve hot or chilled. As shown in the picture.


If you have any queries regarding this recipe don't forget to share your comment, your comments are valuable for me. It would always be a pleasure for me to serve you....And I'll be back soon with an another exciting recipe...


Saturday, August 31, 2019

No Bheja Fry Only Bheja (Brain) Curry....Secret Recipe

Bheja/Maghaz/Magaj or Brain (Urduمغز). I love to eat animal brain. Bheja/Brain Curry is originating from the Indian subcontinent, popular in Bangladeshi and Indian cuisine. The main ingredients of Bheja/Brain Curry are tomato puree, onion, ginger and garlic paste and some freshly grounded spices. Bheja/Brain Curry can be prepared using the brains of goat, sheep and lamb, etc., which is simple, spicy and delicious. In this recipe, I'm going to show you how to prepare a delicious Bheja/Brain Curry without Bheja fry. So, try this simple and delicious Bheja/Brain Curry and I'm sure you and your family would love to eat. 


Total Time: 1 hr 30 mins
Cuisine: Indian
Course: Lunch or Dinner
Servings: 3-4
Author: Ayesha Md


Ingredients:

1 Bheja/Brain (lamb, goat, sheep or beef)
3 meduim size tomatoes (puree)
2 medium size onions (paste)
1/2 tsp fenugreek seeds (methi)
salt as per taste
water required for boiling Bheja/Brain
2 tbsp ginger paste
2 tbsp garlic paste
1-2 tbsp red chili powder
1/2 tbsp turmeric powder
2 tbsp coriander powder
1 tbsp garam masala
1 tbsp cumin powder
2 bay leaves
2 cinnamon sticks
3 cardamom pods
3 cloves
4-6 black peppercorns
1 brown cardamoms
100-150 ml oil
4-6 garlic cloves (whole)
2 inch fresh ginger (whole)
1 onion (roughly sliced)
a bunch of coriander leaves


Steps of cooking:

1) Clean and wash the brain/bheja (lamb, goat, sheep or beef). Now, boil enough water into an empty pot vessel, add roughly sliced onion, fresh ginger (whole), garlic cloves (Whole), salt, brown cardamom, green cardamom, black peppercorn, cinnamon stick, bay leaves and Bheja/Brain. Allow it to cook for about 15-20 minutes.


2) Drain the excess water and remove the Brain/Bheja from the water, let it cool down, then cut into equal size or desire shape and set aside.

3) Take an empty pot vessel, heat oil, then add fenugreek seeds and saute for 15 seconds, then add onion paste, ginger paste, garlic paste, and tomato puree cook for 5 minutes, then add salt, turmeric powder, cumin powder, garam masala powder, coriander powder, red chilli powder. Allow to cook for 15-20 minutes or till oil separates from the curry.

4) Add, previously cooked Bheja/Brain to the curry, mix them well add some water, if required, then cook for 5-10 minutes on very low flame. Now, add coriander leaves and cook for 15-30 seconds. As shown in the picture.


5) Yours delicious Bheja/Brain Curry is ready to serve. Serve hot with your favourite Naan or Rice.


If you have any queries regarding this recipe don't forget to share your comment, your comments are valuable for me. It would always be a pleasure for me to serve you....
And I'll be back soon with an another exciting recipe...

Monday, July 22, 2019

Cheesy Boiled Egg Triple Layer Sandwich

Few Decades ago, the sandwich was popular only in the western world, but these days, it has become popular worldwide.The Sandwich is often eaten as a snack with tea or coffee and sometimes, it can be eaten as a main meal for a lunch and a dinner. The Sandwich can also be eaten at picnic as a packed lunch or dinner. The main ingredients of any sandwich are bread (white or brown), Egg, Cheese, Chicken, Meat, Paneer, Mayonnaise, Salad, Ketchup and Sauce etc., There are varieties of sandwich, which are popular among worldwide such as, Cheese Sandwich, Omelette Sandwich, Shawarma Sandwich, Salmon and Cream-Cheese Sandwich, Tuna Sandwich, Falafel Sandwich, Scrambled Egg Sandwich, Boil Egg Sandwich, Chicken Breast Sandwich, Meat Sandwich, Salad Mayonnaise Sandwich and apart from Savoury Sandwiches there are a variety of Sweet Sandwiches such as, Jelly and Peanut Butter Sandwich and Fruit and Jelly Sandwich etc.

The Sandwich is mostly demanded by children, they love sandwiches and they often preferred sandwich as one of the their lunch boxes. The best thing about a sandwich is that it can be cooked in less time and at the same time, it is healthy and tasty. Healthy and tasty breakfast is one of the issues of our daily life. And at the same time, we want a healthy breakfast for our children. Children love sandwiches, however, making any kind of sandwiches is always a pleasure for me, because I love Sandwich. 
Although I've shared varieties of healthy and easy breakfast recipes and I'll keep sharing with you. So let's try this simple and easy Cheesy Boiled Egg Triple Layer Sandwich...

Prep Time: 20 mins
Cook Time: 45 mins
Course: Breakfast, Lunch or Dinner
Serves: 2-3
Author: Ayesha Md


Ingredients: 

4 Eggs (boiled)
12 Bread slices (White/Brown)
Tomato ketchup (1 tbsp for each sandwich)
Mayonnaise (2 tbsp for each sandwich)
4 Cheese Slices
Salt as per taste
Black pepper powder (as per taste)
Red pepper flakes as per taste (optional)
2 Tomatoes, thinly sliced
Butter, for greasing


Methods of cooking:

1) Take an empty pot vessel and boil the eggs into the water for about 10-15 minutes. Or until completely done. Remove the shell from boiled egg, sliced them using egg slicer.

2) Take a slice of bread and spread a tbsp of mayonnaise and put over 1 egg (whole) slices and sprinkle some salt, black pepper powder and red pepper flakes and a tbsp of tomato ketchup, as shown in the picture.


3) Cover/put it with another slice of bread, then on the top of this bread, add/decorate with tomato slices and a tbsp of mayonnaise and a slice of cheese.


4) Again, cover/put it with another bread.

5) Heat a non-stick pan and grease it with some butter, now place your sandwich over it and lower your flame, cook for about 5 minutes and slowly press with the help of your spatula.

6) Now, again grease some butter on the pan and flip it with the help of your spatula on the other side, cook for 5 more minutes to this side also.

7) Yours delicious 
Cheesy Boiled Egg Triple Layer Sandwich is ready to serve. Serve hot with ketchup.


If you have any queries regarding this recipe don't forget to share your comment, your comments are valuable for me. It would always be a pleasure for me to serve you....And I'll be back soon with an another exciting recipe...

Thursday, June 6, 2019

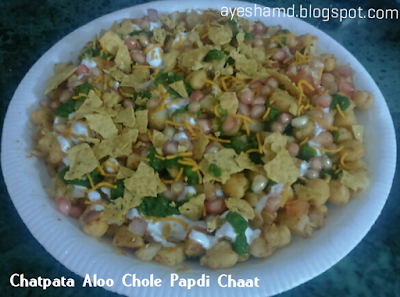
Chatpata Aloo Chole Papdi Chaat.....Iftar Special

Chatpata means Savoury and when it's combined with Aloo (Potato) Chole (Chickpea) Papdi Chaat it gives an awesome taste. During Ramadan, we are always in search of some Chatpata as well as healthy dish. Chatpata Aloo Chole Papdi Chaat is a perfect iftar recipe for you. 


Chickpea (Kabuli Chana) is eaten all over India, but it is a very popular dish in North India. Chickpea (Kabuli Chana) can be eaten as snacks or as a main meal lunch or dinner. However, Chickpea (kabuli Chana) is often made in a spicy delicious and tempting gravy. In this recipe, I'm going to show you how to make a healthy and yummy Chatpata Aloo Chole Papdi Chaat without oil. So, try this new way of making Chatpata Aloo Chole Papdi Chaat which is healthy as well as tasty. And I'm sure you, your family and your children will love to eat this. Let's enjoy this recipe with me #Ayesha Md.....


Prep Time: 30 mins


Total Time: 1 hr 30 mins

Servings: 4-5


Course: Snack 

Cuisine: Indian

Author: Ayesha Md


Ingredients:

200 gm Chickpea (Kabuli Chana)
2 tomatoes, finely chopped
2 onions, finely chopped
1 lemon juice (optional)
1 tsp baking soda
salt as per taste
water as required
2-3 medium size potatoes
250 gm pomegranate (seeds)
some Papdi
2-3 tbsp Chaat Masala
2-3 tbsp Chole Masala
1-2 tbsp red chili powder
1 tbsp cumin powder
100 gm Aloo Bhujia
200 gm yogurt (beaten)
a bunch of coriander/mint leaves
2 garlic cloves
4 green chilies


Methods of cooking:

1) Wash, add salt, water and baking soda, let Chickpea (Kabuli Chana) soak for overnight or at least 8-10 hours.

2) Take a pressure cooker, add soaked Chickpea (Kabuli Chana) along with the water. Turn on the flame, and bring it to a boil, cover the lid of the pressure cooker and simmer for about 10-15 minutes or till it completely tendered. Turn off the flame and drain the excess water. Set aside.


3) Take a pressure cooker, add potatoes, salt and water. 
Turn on the flame, and bring it to a boil, cover the lid of the pressure cooker and simmer for about 10-15 minutes or till it tendered. Turn off the flame, remove the potatoes from the water, run them under cold water and peeled them off and cut into cubes.

4) Take a grinder, add coriander/mint leaves, salt, garlic cloves and green chilies and grind them to make a chutney. Set aside.

5) Take a serving tray, add chickpea and potatoes which was previously boiled, onion, tomato, salt, red chili powder, chaat masala, chole masala and cumin seed, mix them well. And pour beaten yogurt, green chutney, aloo bhujia, pomegranate seeds and papdi at the top.

6) Yours
Chatpata Aloo Chole Papdi Chaat is ready to be served.


If you have any queries regarding this recipe don't forget to share your comment, your comments are valuable for me. It would always be a pleasure for me to serve you....And I'll be back soon with an another exciting recipe...

Thursday, May 30, 2019

Thekua ठेकुआ (Sweet Snack).....Iftar Special

That time of the year has come. A month to repent from our wrong-doings and sin. May all of us find peace on this Ramadan. May this Ramadan bring the blessings for the entire humanity that we can walk in the way of peace and harmony! 

Thekua (Sweet Snack) is very popular in Bihar, Eastern Uttar Pradesh and Jharkhand.  Thekua (Sweet Snack) is a dry sweets from the Indian subcontinent. The main ingredients of Thekua (Sweet Snack) are All Purpose Flour, milk, Semolina, Sugar and Ghee. Thekua (Sweet Snack) is soft when hot, but hardens after it cools. Thekua (Sweet Snack) can be eaten as a snacks. Thekua (Sweet Snack) can be preserved for several days of eating. As we always in search of some good snacks for Iftar, Thekua is a perfect sweet snack for your Iftar. So, try this simple recipe, it is so delicious, healthy and tempting that you, your family and your children will definitely love this...


Prep Time: 30 mins
Cook Time: 1 hr
Total Time: 1 hr 30 mins
Course: Snack
Cuisine: Bihar, Jharkhand, Uttar Pradesh
Servings: 5-6
Author: Ayesha Md


Ingredients: 


250 gm all purpose flour + 4 tbsp for dusting
100 gm semolina
1 tbsp baking powder
100-125 gm sugar
1 tbsp cardamom powder (optional)
6 tbsp ghee
75 ml cold milk
oil for deep frying


Methods for cooking:

1) Firstly, take a large bowl, add all purpose flour, semolina, baking powder, sugar, cardamom powder and ghee, crumble and mix well and then add milk slowly as required and knead into a stiff dough. Cover the dough and rest for at least 15 minutes. As shown in the picture.


2) Now, divide the dough into 3 equal size and sprinkle some flour over rolling pin and roll it with the help of rolling pin to make around 1 inch thick Chapati. With the help of your favorite cookie cutter, cut out into a desired shape. Set aside.

3) Repeat this process to the rest of the dough.


4) Now, take a non-stick pan and heat enough oil, Now place them one by one into the oil. And fry them on low flame for 5 minutes, then on medium flame for another 5 minutes, turning occasionally till they turn light golden brown. Remove from the oil and drain in a kitchen paper.


5) Once it gets cool down. Store it in an air tight container and use for up to a week. 
Yours Thekua (Sweet Snack) is ready to enjoy with a cup of tea.

Note: 


a) Oil should be enough hot while frying Thekua, otherwise it will break.

b) Only a small batch of Thekua should be fried at a time.

c) Don't add too much milk while kneading your dough. Dough should be tight.

d) Always fry Thekua on low flame for 5 minutes, then gradually increase your flame on medium to high, otherwise it will not cook from inside.


If you have any queries regarding this recipe don't forget to share your comment, your comments are valuable for me. It would always be a pleasure for me to serve you....
And I'll be back soon with an another exciting recipe...

Monday, May 20, 2019

Chickpea (काबुली चना) Potato Salad...Ramadan Special

Alhamdulillah, We got the Ramadan once more in our life! May this holy month bring peace around the world unifying everyone everywhere. 

The Chickpea is important in Indian and Middle Eastern Cuisine, and I
ndia is the largest producer of Chickpea with 65% of global production. Chickpeas are a nutrient-dense food, providing rich content (20% or higher of the Daily Value, DV) of proteindietary fiberfolate, and certain dietary minerals, such as iron and phosphorus in a 100 gram reference amount. Thiaminvitamin B6magnesium, and zinc contents are moderate, providing 10–16% of the Daily Value. A 100 g serving of cooked chickpeas provides 164 kilocalories (690 kJ). Cooked chickpeas are 60% water, 27% carbohydrates, 9% protein and 3% fat 75% of the fat content are unsaturated fatty acids. Source taken from https://en.wikipedia.org/wiki/Chickpea

Although, Chickpea (Kabuli Chana) is eaten all over India, but it is a very popular dish in North India. Chickpea (Kabuli Chana) can be eaten as snacks or as a main meal lunch or dinner. However, Chickpea (kabuli Chana) is often made in a spicy delicious and tempting gravy. In this recipe, I'm going to show you how to make a healthy and yummy Chickpea (Kabuli Chana) Potato Salad without Spices. So, try this new way of making Chickpea (Kabuli chana) Potato Salad which is healthy as well as tasty. And I'm sure you and your family will love to eat this. Let's enjoy this recipe with me #AyeshaMd....


Prep Time: 30 mins


Total Time: 1 hr 

Cuisine: Indian 

Course: Snack, Lunch and Dinner 

Servings: 4


Author: Ayesha Md


Ingredients:

200 gm Chickpea (Kabuli Chana)
2 tomatoes, finely chopped
2 onions, finely chopped
1 lemon (juice)
1 tsp baking soda
salt as per taste
water as required
2-3 medium size potatoes


Steps for cooking:

1) Wash, add salt, water and baking soda, let Chickpea (Kabuli Chana) soak for overnight or at least 8-10 hours.


2) Take a pressure cooker, add soaked Chickpea (Kabuli Chana) along with the water. Turn on the flame, and bring it to a boil, cover the lid of the pressure cooker and simmer for about 10-15 minutes or till it completely tendered. Turn off the flame and drain the excess water. Set aside.


3) Take a pressure cooker, add potatoes, salt and water. 
Turn on the flame, and bring it to a boil, cover the lid of the pressure cooker and simmer for about 10-15 minutes or till it completely tendered. Turn off the flame, remove the potatoes from the water, run them under cold water and peeled them off and cut into cubes.

4) Take a serving tray and add boiled Chickpea (Kabuli Chana), potato, onion, tomato, salt and lemon juice mix them well.


5) Yours Chickpea (Kabuli Chana) potato Salad is ready to be served.


If you have any queries regarding this recipe don't forget to share your comment, your comments are valuable for me. It would always be a pleasure for me to serve you....And I'll be back soon with an another exciting recipe...

Wednesday, May 1, 2019

Firni فرنی (Rice Pudding)....Summer Sweet Dessert

What is a Firni (Rice Pudding)?

Let's briefly discuss. Firni is a creamy rice/sweet pudding which is made up of ground rice, milk, sugar, almonds, pistachios, saffron, green cardamom and kewra essence. Firni (Rice Pudding) is a popular sweet dish. Although, dessert is a perfect sweet for all occasion, Firni (Rice Puddding) is often eaten during festivals and during summer it is mostly demanded by people. Firni (Rice Pudding) is originated during the Mughal Empire in India. Firni (Rice Pudding) is very similar to Rice Kheer, but it has one slight distinction between Rice Kheer and Rice Firni, that Rice Kheer is made up of Whole Basmati Rice whereas, Rice Firni is made up of Coarsely Ground Basmati Rice. There are various types of Firni (Rice Pudding) such as Kesar Firni, Saffron Firni, Rice Firni, Almond Firni, Rice Firni, Mango Firni, Strawberry Firni and Rose Firni. Firni (Rice Pudding) is traditionally, serve in a bowl or an earthen clay cup, then topped with almonds, pistachios and saffron strands. Firni (Rice Pudding) is often served chilled. Let's try this simple and yummy Firni (Rice Pudding) and I'm sure you will definitely love this. In this recipe, I'm going to show you how to make a delicious Firni (Rice Pudding) in just 5 simple steps.....


Prep Time: 10 mins


Cook Time: 45 mins

Servings: 4-5


Cuisine: Indian

Coarse: Sweet dish 

Author: Ayesha Md


Ingredients:


1 liter whole milk
6 tbsp whole basmati rice
1-2 tbsp kewra essence
200 gm sugar (as per taste)
4 green cardamoms (powder)
water required for soaking rice
6-8 Almonds (chopped)
6-8 Pistachios (chopped)


Methods of cooking:


1) Wash and soak Whole Basmati Rice in sufficient water for at least 1 hour.

2) Take a heavy based saucepan, add milk, green cardamom powder and sugar and bring it to a boil. Turn your flame on low and cook for 5 minutes. Turn off the flame now. As shown in the picture.


3) Now drain the excess water from the rice and grind them to make a paste. You can also add 4-5 tbsp of milk or water to make a perfect paste. As shown in the picture.


4) Now add this rice paste into the milk and gently mix them well. Now, turn on the flame and cook for about 10-15 minutes on low flame, keep stirring continuously and scrap the sides of the pan. Add kewra essence and stirring constantly for another 5 minutes or until it becomes thick, turn off the flame.

5) Pour this into a serving bowl or an earthen clay cup and set aside. When it comes to at room temperature, then refrigerate it for at least 4 hours or overnight. Garnish with chopped almonds and pistachios. Yours Firni (Rice Pudding) is ready to serve. Served chilled. As shown in the picture.


If you have any queries regarding this recipe don't forget to share your comment, your comments are valuable for me. It would always be a pleasure for me to serve you....And I'll be back soon with an another exciting recipe...

Thursday, April 25, 2019

Afghan Pulao Uzbeki...قابلی اوزبیکی


Afghan Pulao Uzbeki.....قابلی اوزبیکی  is a main course typically made with rice, meat, spices, grated carrots, onion and raisins. Afghan Pulao Uzbeki is usually prepared at home for family or guest/wedding. Afghan Pulao Uzbeki is prepared in one pot, meat, rice, carrot and stock is added and topped with fried raisins. This recipe is so simple and it's so delicious that you will definitely love. In this recipe, I'm using special Afghan Pulao Masala, which is one of the most necessary ingredients and is called the heart of the recipe. So, what are you waiting for, let's enjoy this recipe with me...step by step......


Prep Time: 30 mins
Cook Time: 1 hr
Servings: 2-3
Cuisine: Afghan
Course: Lunch and Dinner
Author: Ayesha Md


Ingredients:


600 gm fatty meat (beef/mutton) with bone (cut into 4-6 large pieces)
75 ml oil
500 gm brown rice
2 medium size onions, thinly slice
3 bay leaves
2 cinnamon sticks
2 cloves
500 ml water
2 tbsp ghee for frying meat
salt as per taste
2 carrots (Julienne cut)
50 gm raisins
4 tbsp ghee for frying raisins


Afghan Pulao Masala:


2 tbsp cumin seeds

4 green cardamoms

1 brown cardamoms


Methods of cooking:


1) Wash and soak brown rice for 2 hours.

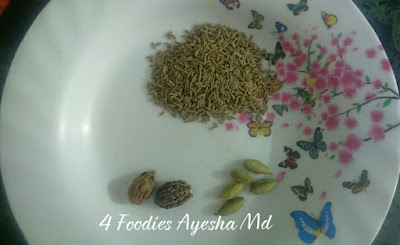
2) Take a mixer/grinder, and grind all the spices to make a powder, namely green cardamoms, brown cardamoms and cumin seeds. As shown in the picture.


3) Wash and clean meat pieces and set aside. Take a large pressure cooker, heat oil, then add bay leaves, cinnamon sticks, cloves, saute for 2 seconds. Add onion and saute well and cook for 5 minutes and add meat pieces and saute them well and cook till they change its color or turn slightly golden brown. Add salt, water and grind spices. Bring it to a boil and cover the lid and cook on low flame for about 20-30 minutes or until completely tender.


4) Open the lid of the pressure cooker and remove the meat pieces from the broth measure the broth, it should be 500 ml, if it is less than that, add a little more water. Add salt, carrots and rice, bring it to a boil. Cover the lid of the pressure cooker and cook for 5-10 minutes on low flame. As shown in the picture.


5) Heat a skillet, grease it with some ghee now add those meat pieces which had taken out of the broth previously. Place them one by one in the skillet and cook for 5-10 minutes on medium flame, turning occasionally, when they turn brown remove them from the skillet and set aside.


6) Open the lid of the pressure cooker, if there is excess moisture or water, simmer for 5-10 minutes on very low flame.

7) Take a pan, heat ghee, add raisins and fried till it turns golden brown. Add them on the top of the rice.


8) Assemble them into a serving tray. Yours Afghan Pulao Uzbeki.....قابلی اوزبیکی is ready to be served. As shown in the picture.


If you have any queries regarding this recipe don't forget to share your comment, your comments are valuable for me. It would always be a pleasure for me to serve you....And I'll be back soon with an another exciting recipe...

Tuesday, April 16, 2019

Rajma (Red Kidney Beans) Pulao/Fried Rice

Rajma (Red Kidney Beans) is a popular vegetarian dish, originating from the Indian-subcontinent. Rajma (Red Kidney Beans) has high quantities of Calcium, Fiber, Folic acid, Carbohydrates and Proteins. Rajma (Red Kidney Beans) has many benefits such as it helps in weight loss, lowers cholesterol, improves memory, it reduces the risk of developing diabetes, rich in proteins, boost energy and due to the presence of calcium and magnesium it helps to strengthen bones.

However, Pulao is loved by all. There are varieties of Pulao such as Chicken Pulao, Meat Pulao, Vegetable Pulao, Paneer Pulao etc., Rajma (Red Kindy Beans) Pulao/Fried Rice is a very special Pulao. The main ingredients are Rajma, Rice, Yogurt and Spices. In this recipe I'm going to show you how to make Rajma (Red Kidney Beans) Pulao/Fried Rice with very simple and easy steps.... Just follow these steps....


Prep Time: 30 mins

Cook time: 1 hrs 30 mins
Serves: 3-4
Course: Lunch and Dinner
Cuisine: Indian
Author: Ayesha Md


Ingredients: 


250 gm Rajma (Red Kidney Beans)
750 gm brown rice
750 ml water
salt as per taste
100 ml yogurt
1 tbsp red chili powder
2 onions (medium size), thinly slice
2 tomatoes, finely chopped
1 tbsp cumin seeds
3 bay leaves
2 cinnamon sticks
3 green cardamoms
3 cloves
6-8 black peppercorns
2 brown cardamoms
1/4 mace powder
100 ml oil
1 tbsp ghee
4 tbsp Shan Biryani Masala
2 tbsp garlic paste
2 tbsp ginger paste
3 green chilies (remove the stems)
1 tsp baking soda double action

Methods of cooking:


1) Wash and soak Rajma (Red Kidney Beans) in water. Add salt and baking powder, and soak it for overnight or at least 6-8 hr.

2) Wash and soak brown rice for 2 hrs.

3) Take a pressure cooker and add soaked Rajma (Red Kidney Beans) along with the water, cover the lid of the pressure cooker and cook for about 15 minutes on low flame or until it is 60% cooked or tendered. Drain the excess water and set aside.


4) Take an another pressure cooker, heat oil, add bay leaves, cinnamon sticks, green cardamoms, brown cardamoms, cloves, black peppercorns and cumin seeds and saute for 30 seconds. Then add onion and saute for 10 minutes or until it turns golden brown. Add ginger garlic paste, salt, yogurt, red chili powder, mace powder, Shan Biryani Masala and cook for 10-15 minutes, then add cooked Rajma (Red Kidney Beans), cook for another 5 minutes.

5) Now add water, rice, salt, green chilies and tomatoes. Bring it to boil and cover the lid of the pressure cooker and cook on low flame 8-10 minutes.

6) Open the lid of the pressure cooker, if there is excess water, then evaporates them on high flame. Add ghee at the top and let it simmer on very low flame for 5-10 minutes.


7) Yours Rajma (Red Kidney Beans) Pulao/Fried Rice is ready to be served. Serve hot with your favorite Raita.


If you have any queries regarding this recipe don't forget to share your comment, your comments are valuable for me. It would always be a pleasure for me to serve you....And I'll be back soon with an another exciting recipe...

Friday, April 12, 2019

Sugar Wax...Hair Removal Recipe Just Rs.10

Sugaring, Sugar Waxing or Persian Waxing is a method of hair removal that has been in use since 1900 BC. Sugaring was also known as sukkar or ḥalawa in the Middle East. Sugaring or Sugar Waxing can be prepared with common household items such as water, lemon juice, sugar and saltAs in candy making, this gives the finished. Sugaring wax a non-crystalline, or amorphous, structure. Getting the correct consistency takes practice for most users. Sugaring or Sugar Waxing is done with only a ball of sugar paste- no strips are needed. This method includes applying the paste to the area against the direction of hair growth and removing the sugar paste in the direction of hair growth. This produces less pressure on the hair shaft, leading to less breakage, and resulting in smoother skin than traditional wax. Source taken from: https://en.wikipedia.org/wiki/Sugaring_(epilation)

Let's discuss some of the advantages of Sugaring or Sugar waxing hair removal. It is 100% natural, longer lasting, better result and easy to clean. It is less painful, more effective and even very short hair can be removed. Sugaring or Sugar Waxing is preferable to all types of skin that's why it is called skin friendly. It minimized the risk of ingrown hairs. Sugaring or Sugar Waxing, if used regularly re-growth is very thin and gets thinly dispersed. Sugaring or Sugar Waxing can be treated to large body areas with little amount of sugar paste. Sugaring or Sugar Waxing can be prepared with just Rs.10. It is cost effective. So, if you tired of spending too much on hair removal product, then at least try this Sugaring or Sugar Waxing recipe.... Follow these simple steps....just 4 ingredients.....


Prep Time: 2 mins
Cook Time: 10-15 mins
Serves: 1
Author: Ayesha Md


Ingredients:


200 gm Sugar (fine)
4 tbsp water
1/2 tsp salt
2 tbsp lemon juice

Methods of Cooking:

1) Take fine sugar, lemon, salt and water. As shown in the picture.


2) Take an empty vessel, add fine sugar, lemon salt and water. Mix them well.

3) Now cook this mixture on very low flame about 5-10 minutes, stirring continuously, until sugar dissolved completely. As shown in the picture.


4) Turn the flame high for 1-2 minutes. Cook this Sugaring or Sugar Waxing till it turns slightly golden brown. Turn off the flame.

5) Pour into another bowl and allow it to cool down for 5-10 minutes. As shown in the picture.


6) Once it has cooled down, take a spoonful or small amount of and play with your hands for some time and then make a small ball in shape. As shown in the picture.


7) Yours
Sugaring or Sugar Waxing is ready to use. As shown in the picture.


Notes:

1) It is too hot to use directly, so allow it to cool down for 5-10 mins. Then start using it once it has cooled down.

2) Take only small amount of sugar ball so that u can throw that when it is no longer in use.

3) If Sugar Waxing become so hard, then heat it for just 2 seconds or melt it. Don't need it to cook. Otherwise, it will not be usable.

4) You can use that up to 1-2 hrs or more at room temperature.


If you have any queries regarding this recipe don't forget to share your comment, your comments are valuable for me. It would always be a pleasure for me to serve you....And I'll be back soon with an another exciting recipe....

Angoori Rasmalai

Rasmalai   is an Indian popular sweet dish.  Rasmalai  got its name from the two words, these are  Ras  means sweetened  milk syrup   and  M...